View Integration Documentation
![]()
What is OpenCVE
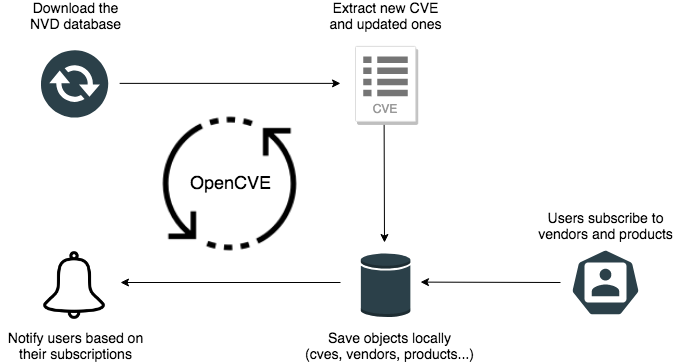
OpenCVE is a platform used to locally import the list of CVEs and perform searches on it (by vendors, products, CVSS, CWE…).
Users subscribe to vendors or products and OpenCVE alerts them when a new CVE is created or when an update is done in an existing CVE.
You can manually install OpenCVE, or use docker. We also provide a running instance on https://www.opencve.io if you don't want to host it yourself.
How it Works
OpenCVE uses the JSON feed provided by the NVD to update the local list of CVEs.
After an initial import, a background task is regularly executed to synchronize the local copy with the NVD feed. If a new CVE is added, or if a change is detected, the subscribers of the related vendors and products are alerted.

Note: It is recommended to run this integration and OpenCVE on an XSOAR engine.
What does this integration do?
This integration uses the OpenCVE APIs to ingest and enrich CVEs. You can pull CVEs for a vendor, product, or individually and get information like:
- CVSS v2/v3 info
- Score
- Vector
- Vector broken down for easy understanding
- NVD and Mitre links to CVE
- Tags for all vendors and products related to the CVE
Installation
There are two parts to the installation: OpenCVE and optionally an XSOAR engine (recommended). If you want to deploy a standalone instance of OpenCVE, skip to the OpenCVE installation section, or see their documentation.
Install XSOAR Engine
Prerequisites
- Fresh Linux installation (CentOS, RHEL, Ubuntu, etc.)
- See Documentation
Installation
In XSOAR navigate to Settings > Integrations > Engines and select Create New Engine in the upper right. This will create a link to a script that should be put on the engine VM. Run the script to install the XSOAR engine.
See the official documentation for more information.
Install OpenCVE
Prerequisites
Make sure the following are complete before moving on:
- Python >=3.6 installed
docker-composeinstalled- Current user is in the
dockergroup
The instructions below will deploy via docker-compose the following services:
webserver: used to present the data to the user (also provides the API) on port8000postgres: used to store the data (CVE, Users, Vendors, Products, Subscriptions, etc.)celery_workerandcelery_beat: used to periodically fetch the NVD database and update the list of CVEsredis: brokerscelery_beatwithpostgres
Note: The XOAR engine does have Docker installed but it does not have
docker-compose. You will need to installdocker-composeon your own (typicallypip3 install docker-compose, but this may change depending on distro and setup).
Installation
Installation is fairly straight forward.
- Start by cloning the repo
 git clone https://github.com/opencve/opencve-docker.git
cd opencve-docker && cp ./conf/opencve.cfg.example ./conf/opencve.cfg- Next edit the config file and update with your settings.
Note: The two main fields to update are
server_nameandsecret_key. The rest of the defaults are fine and the email options at the end are optional.
vim conf/opencve.cfgIf you ever need to change these settings, restart the docker containers for the changes to take effect.
- Build the images and start
postgres,redis, thewebserverandcelery_worker
 docker-compose build
docker-compose up -d postgres redis webserver celery_worker- Next, ingest the CVEs from NIST.
⏳ Note: This can take around an hour
 docker exec -it webserver opencve upgrade-db
docker exec -it webserver opencve import-data- Start
celery_beatwhich will monitor for changes and ingest new CVEs
docker-compose up -d celery_beat- Create an admin user
 read -p "Enter admin username: " USERNAME
 read -p "Enter admin email: " EMAIL
 docker exec -it webserver opencve create-user ${USERNAME} ${EMAIL} --admin
OpenCVE is now running on http://<server_ip>:8000. Log in and subscribe to some vendors and products.
- Configure the integration.
Note: ⚠️ Remember to select the engine where OpenCVE is installed